Wednesday, 28 September 2016

Instagram App For Windows 10 Mobile Updated With New Features

I just can't imagine how Windows smartphone users cope with the limited number of applications they have at their disposal. Unlike their android and iOS counterparts, many developers sideline the window mobile platform when developing a new app. While some of the available apps on the windows mobile store are already discontinuing support for their apps, the other available ones gives the platform less priority which makes them release new features and updates a bit late.
Instagram has just released a new update for the windows 10 mobile platform with new features. Although this features have been available on both android and iOS platform for sometime now. But it's a good it's now available for windows mobile users as well.

Now windows phone users can now use the Instagram "pinch to zoom" feature. Which means that Instagram users can easily zoom any picture on their Instagram feed. Aside that, the comments moderation feature is now also available and it gives you a bit more control over the type of comments that can be posted below any of your Instagram post.

Although there are some other new features and improvements, but those are the two major features available.

You can download the App for your windows smartphone from the Link below.

Monday, 26 September 2016

HOW TO UPGRADE INFINIX HOT 2 AND OTHER RELATED SMARTPHONES WITH O.T.A(over the air) SUPPORT

unfortunately infinix hot 2 will get a Latest update but you cant update it.even if you actually gets connected to a wifi network, the update will be placed on condition i.e a certain month before you can update it.
But today i will be showing you strictly on how to update your phone without wasting of time
First of all,remove your phone from authomatic time update 

Untick authomatic time zone
And also switch off automatic time and date 

Note::make sure you are in one anoying Whatsapp group before proceding to the next step

Step II

Fast forward your phone date to the one that the phone update can be downloafing  e.g (via wifi only until nov 22)

Step III

Then go back to settings=about phone=system update. 
And consistantly clicking on retry download..... and then the role of that annoying Whatsapp group will come to pass.. It will automatically revert your phone date back to the current(normal)date once any message enters your phone and from there the download will stat immediately 

If this article was helpful. Why dont take a time to share to Friends
And the best of all feel free to ask any questions via the comment box
Powerd by alex-muxty

һoɰ ţo sɰѧp s.Ԁ ċѧяԀ ţo pһoňє sţoяѧɢє 

Lots of people are telling me to make a tutorial on swap internal storage with the SD card .This is so simple process and I try to make most simple, easy and safe guide it. We saw many android phone give low phone memory error and we all want more free space on your Android phone storage for download large size games and install lots of apps. But we can’t do it because of low phone memory (space). In this case, you can swap your phone storage with an external SD card and resolve your low space problem.

In this swap internal storage with the SD card process, we want a rooted phone which has installed root file manage app like root explorer, ES file manager, etc. I am using root explorer app in this guide, it is a good root file manager app, but it’s paid app, if you don’t want to purchase this app then you can use any free root file manager app. According to my experience this process can’t brick your device. But safe side, you take a backup of your phone, then do it. And first read all steps, if you don’t understand these steps, then don’t do it and tell us your problem via comment, I will try to resolve your issues.
Easy steps to swap internal storage with the SD card in your Android Device:

But first of all, We need a rooted phone for this process. You can use king root for rooting your phone which is very trusted . After root your phone, install root file manager. You have ţo downloaStep root explorer or es file explorer
Step 2: Open the Root explorer app >>> then go to root folder >>> then find and tap on the system folder >>> Now you can see the ETC folder, open this folder >>> after then you will see a list of files and folder, Now find vold.fstab >>> tap on this file, you will get lot’s of option, now tap on text editor option. You can see all steps in this image.


Step 3: After tap on the text editor, you will get a popup tab from Su app for giving root permission to root explorer app >>> tap on the grant option >>> then you will get a warning message for remount as read-write then tap on yes. See in this image.


Step 4: Now vold.fstab file open for you, find these two line in this file:

dev_mount sdcard /storage/sdcard0 emmc@fat /…………

dev_mount sdcard2 /storage/sdcard1 auto /…………….

You can see these lines in this image. Not much to do here, just change sdcard0 with sdcard1 in the first line and sdcard1 with sdcard0 in the second line >>> Now tap on the menu button in the phone >>> and tap on save and exit >>> close root file explorer app and reboot your phone or device. that’s all.


If you feel any problem in this swap internal storage with the SD card process, then watch this video of this process on YouTube, click here and if you don’t find vold.fstab file or find blank vold.fstab file, then use this guide : Swap internal storage with the SD card in Android Lollipop and KitKat
Note: After swap internal storage with the SD card process, you will see two files 1. vold.fstab and 2. vold.fstab.bak in the root/system/etc folder. vold.fstab.bak is a backup of your vold.fstab file, if you feel any issue with your phone after this editing, then remove .bak in the name of your backup file and replace with your vold.fstab file.

I hope you like this swap internal storage with the SD card guide from which you will be able to easily swap internal storage with the SD card without any extra efforts. If feel any problem in this guide then please use comment box. Thanks to all.

Sony Is Bringing The PlayStation Games To Android And iPhone Devices

Recently, Nintendo announced plans to start developing games for mobile devices and it started off with Pokemon which experienced a great popularity and success within a very short period of time. Now Sony has also decided to follow the same part by focusing on the Evolution of games and applications for mobile devices.
 
Sony has just created a new company know as "Forward Works" which will focus fully on developing games for smartphone. The company which will start operation in 2016 will work on extending Sony's PlayStation gaming division onto Mobile platforms. It will take advantage of all the rights which it has on titles of PlayStation and characters in it so that the new games have exclusive content from Sony.

According to a statement by Sony Computer Entertainment Inc. (SCEI), “ForwardWorks will leverage the intellectual property of the numerous PlayStation dedicated software titles and its gaming characters as well as the knowledge and know-how of gaming development expertise which was acquired over the years with PlayStation business to provide gaming application optimized for smart devices including smartphones to users in Japan and Asia. The company will aim to deliver users with the opportunity to casually enjoy full-fledged game titles in the new filed of the smart device market.”

Apparently, the main purpose of ForwardWorks is to use Sony's experience in gaming development to optimize PlayStation games for mobile phones and tablets. 

Also when operation finally kicks off at the company's new devision, the name Sony Computer Entertainment Inc. (SCIE). will be changed to Sony Interactive Entertainment(SIE). Since the headquarters is in Tokyo, the company will initially focus it's development for users in Japan and Asia in general, and if the result is satisfactory enough, then it will be revealed globally.

This is more like Sony trying to start a competition with Nintendo. But either way, I think it is a good thing for we the users as it leaves us with different options to choose from. I personally can't wait.

Help! My PC no Longer Recognises my Android as a USB Drive

I know this can be so annoying atimes and frustrating, imagine you want to transfer files from your Android device to your PC only to discover that its not been recognize by your PC as a hard drive. So you plug, re-plug, and even check the wire but no avail.


I’ve experienced this before, and I even experienced it on almost every Android device I’ve been privileged to own… but with the help of the guide below, you’ll be able to fix this problem depending on the action you take.

There are different methods to solving issues like this hence I’ll carefully explain each.

Method 1: Change Your USB Cable; USB cable atimes normally causes incompatibility between your Android and PC so it is advisable to try different original USB Cable before trying the next method. It will amaze you to note that bad USB cable won’t even charge the device talk more of giving you access to transfer files to your PC.

Method 2: Uninstall and Re-Install Android Drivers:
This method actually worked well for me and it is very easy to navigate through from your Window 7,8 or 10 PC.
>>Connect your Android device to PC (even when the device is not recognize)
>> Go the the ‘Device Manager’:  either right click on ‘My Computer’ and select ‘properties’ then ‘Device Manager’  in the left sidebar, or go to ‘Control Panel’ then ‘system’ then ‘Device Manager’ from the left sidebar.
>>Next, find the Android device manager or scroll down to Portable device or other device, uninstall the drivers.


>> Once the drivers are uninstalled, unplug your device from the PC. Make sure your computer is connected to the Internet and automatic updating is turned on, then replug your device and allow Windows to find and install the drivers all over again.
>>You can now go to my computer and check if your device appears as a hard drive, if so, you are good to go. If not, proceed to the next method.

Method 3: Set Your Android  to connect as a ‘Media Device’ (MTP)


>> Go to settings >> storage. Next, go to more options and click ‘USB Computer connection’. Next  click on the ‘Media Device’ (MTP) checkbox. If already checked, try unchecking it, exiting out of settings, then coming back again and rechecking it.

Method 4: Enable USB Debugging Mode
Go to settings>>Additional settings>>Developers options>> and scroll down to enable USB debugging . 


Once USB debugging is enabled, unplug and re-plug your device into your PC, and see if that solves the problem.

If you’ve tried all the above and nothing seems to work, then you device might seems to have a faulty base. If you have had trouble getting the device to charge, or if you need to manipulate the position of the wire to get it to charge, these are all clues that the problem may be your charging base.

How To Create A Full Backup Of Your Windows 8.1 Or Windows 10 PC


A system failure or users mistake on either a PC or even a mobile device can lead to loss of files, applications and even settings. And sometimes situation like this are inevitable, that's one of the major reasons why it's important to always create a regular backup. Windows actually makes it very easy to make an exact backup of your complete computer system using the "system image backup utility" but unfortunately not many user knows or uses it.
 
The image backup utility which is available on Windows 8.1 and windows 10 lets you create a bit by bit copy of your full system which includes the full installation of your current operating system, windows applications, system settings, desktop programs and your personal files.

This will come in handy whenever you encounter a hardware failure, software error or maybe any other problem caused by users mistake. With the image backup, you can easily perform a complete system restore and get your PC back to its normal state.

So i guess have explained a little on what the image backup is. So now I will guide you through on how to create a system image backup and also how to restore it.

How To Create Full Image Backup In Windows 8.1 Or Windows 10
This particular procedure works on Windows 8.1 and Windows 10. Make sure you have an external USB drive with sufficient storage space in place before you begin.
==> Open your control panel.
==> Click on File history.
==> Click on system image backup from the bottom left corner of the screen.
==> Now connect the external USB drive you want to use.
==> From the system image wizard, you will be asked to select on of the three save options but it's advisable you go for hard drive since it's a lot more faster.
==> After selecting hard drive, just click on Next to continue.
==> Now just confirm that the right drives are selected and click on Start backup to begin the process.

NOTE: The backup process can take a couple of minutes or even run into hours depending on the size of your backup.
Also why the backup process is going on, you can go ahead and do other things with your computer.

How To Restore Your PC With The Image Backup
Before you can restore your computer with the image backup, you surely must have created a backup with the procedure above.
==> Connect the drive which contains your system backup to your PC.
==> Reboot your PC with the installation media.
==> From the windows setup windows, click on Next and select repair your computer from the bottom left corner of the screen.
==> Click on Troubleshoot >> Advance options >> System Recovery.
==> Select the operating system you want to restore and click on Next.
==> Click on Finish after the whole recovery process and that's all.

So guys that's a detailed guide on how to create a system backup image and also how to restore.

If you have any question, feel free to ask and also don't forget to share this post.
Credit: Windows Central

Saturday, 24 September 2016

How To Make Interbank Transfer With Just N50 Bank upCharges

It is no longer new that banks charge their customer for interbank transfer (transferring from one bank to another) at mostly N105 on each transfer made.
But this evening I'll show you a new way to make inter-bank transfer with just N50. Please note that it is 100% legit it is not a trick.
The app that makes this happen is called buxme created by wema bank to make money transfer and receiving easy.


Description Of Buxme
• You can send money to anyone using their phone number or email address or bank account.
• Sending money across banks costs just 50 naira only.
• Money moves directly from your bank account to the receiver's bank account. In other words, this is not a wallet.
• You get to see a clear summary of how much money you have sent versus how much you have received.
• You can add friends and also send them money requests when you need a quick loan.
• The app is bank-agnostic and works with any Nigerian bank-issued debit card.
• You don't need to forcefully signup or download the app to
receive money by email or phone number.

Where Can I Download Buxme?
==>Android users and ios user should download it from their respective store or from the official website
Hope this will save you the cost of N55 being charged by our local banks?
Take 30sec of your time to share this post on social media don't be stingy.

Friday, 23 September 2016

WhatsApp May Soon Introduce A Pass code Security Feature

Aside being a very popular messaging app, one other thing WhatsApp is really known for is that extra attention the Facebook owned app gives to security and privacy. In a bid to further increase users privacy, the company went further to introduce an end to end encryption in April of this year.


But even with the whole end to end encryption, it does very little in stopping people from reading your conversation as long as they have access to your Smartphone. But this might soon change as the company might be introducing a 6 digit pass code option in the nearest future.

Apparently, some details were spotted by "android authority" as part of a text translation program for WhatsApp, to convert strings from English into Dutch. Phrases to be translated include “Enter the current six-digit passcode:“, “Passcodes don’t match. Try again.“, and “Enter a recovery email address“, And all this really makes indication that a pass code option might be introduced soon.

Also there is a line that suggests an optional recovery e-mail incase a user can't gain access to the WhatsApp app due to wrong pass code.

As I said earlier, this new feature is still being tested and hasn't been made official yet. So we don't really know how soon this feature will be rolled out. Whenever this happens, it will further increase the security and privacy that WhatsApp is really known for.

Thursday, 22 September 2016

How To Fix Expired Links And Retry On Ucbrowser While Downloading


Have you ever tried downloading file worth of 5GB with your phone before? You will notice that the download  will always break before you finish downloading it. It might bring up expired link, retry, low memory space e.t.c which is caused by poor network or low bandwith on the server.

This morning, I will be showing you very quickly how to fix this errors in less than 3 min you can apply toothpaste to your brush and brush along as you read this post.lol


Go to the ucdownloads folder and locate the file you are downloading it will be in two format e.g yourfilename.apk and the second one yourfilename.dtemlp then move them to a separate folder.
Next thing is to go to uc downloads then delete the file from download manager don not tick delete file source.
Start the download from a fresh link again then immediately you have downloaded 1-2% from it pause the download.
Go to the UCdownloads folder delete the new 2 files yourfilename.apk and yourfilename.dtemlp then replace it with the 2 files you move earlier.
Resume your downloads then you will notice it will start from where it stopped earlier.
Don't just tap knowledge from others if you have methods for resuming downloads on other browsers kindly drop it via the comment box your contribution is appreciated.

Opera Unlimited Free VPN Now Available On Linux, Windows And Mac OS

With the increasing case of Cyber theft and online hacking, the use of VPN is almost inevitable especially if you need extra privacy and online security. Although there are many effective VPN apps out there, but the only problem is that they are all paid app. And that is one reason why Opera has decided to introduce its own free unlimited VPN app on all desktop platforms.

After launching its free unlimited VPN for android and iOS users, Opera has finally decided to introduce the free VPN to the desktop users. Although this new VPN is intergrated with the latest Opera desktop browser, so all you need to do is to upgrade to the latest Opera 40 browser on either your windows, Linux or Mac OS.
The latest Opera 40 browser for desktop offers free, unlimited, no log required VPN service, and just like the opera mobile VPN app, it also gives you the ability to choose from any of the five available servers which are Canada, Germany, The Netherlands, Singapore and United States.

How To Turn On The New Opera VPN
For Mac users, launch your opera browser, navigate to preferences >> privacy and security >> then toggle the VPN.
While for Linux and windows users, navigate to settings >> privacy and security >> then toggle the VPN.

Click here  to download opera 40 browser

Google Allo, Latest Social Messaging App From Google


Over the years we have witnessed the birth of various social messaging apps such as we chat, telegram, messenger, WhatsApp among others. But now after the unsuccessful reign of google hangout, Google has decided to introduce a new social messaging app which is called google allo.
This new app is coming roughly a month after Google released their one off video calling app which they called Google duo. But unlike most of the messaging apps we are used to, this app actually comes packed with a lot more features like some better doodles, stickers, huge emoji, easily customizable text and also Google assistant which is really the highlight of this new app
You can check out some of its features below
Smart Reply
Respond to messages without typing a single word. Smart Reply learns over time and suggests responses to text and photos, in your style.
Get creative with the photos you send by doodling on them or adding text.
Stickers 
Say it all with the perfect sticker. Stickers in Google Allo are designed by independent artists and studios from around the world.
SHOUT or whisper 
No more typing in ALL CAPS to get your point across. Say it louder or quieter by changing the size of your text with a quick swipe.
Google Assistant
Google Allo brings you the Google Assistant, preview edition. Find restaurants nearby, share videos to watch, and get answers, right in your conversation with friends. Add @google to your group conversation or chat one-on-one with your Assistant. It’s your own personal Google, always ready to help.
Incognito mode
Send messages with end-to-end encryption, use private notifications to help keep your chats more discreet, and control how long your messages stick around with expiring chats.

Just like most other messaging apps, this app is actually connected to your mobile no and that's all you need to create an account. Also you will be able to see all your contacts that already has an account and also chat with them easily.

This app is already rolling out on playstore. But if you can't find it then download from this link

Latest Mtn Unlimited Free Browsing For PC Users With Your-Freedom VPN

This is probably the longest we have gone without any mtn free browsing tweak. Although the Glo Unlimited Free Browsing tweak is still working, but the only problem is that many people have been complaining of poor network reception in thier location.
Today am going to be sharing a new mtn free browsing tweak for all mtn PC users using your-freedom VPN. Although this tweak is completely free and unlimited, it's a bit slow especially if you plan to download with it.
Requirements:
>> Your windows PC.
>> Mtn Sim.
>> A modem.
>> Your freedom.exe application.
>> Your freedom account.
Incase you don't have an account, 
√ Just open Your-freedom.de on your web browser
√ Create a new account.
√ Download your-freedom app from the website and install it into your PC.
How To Configure The Mtn Free Browsing With Your-Freedom App
=> Launch your-freedom app and click on configure.
=> On Your-Freedom Server Address Tab Enter the following XML server name = ems02.your-freedom.de or ems19.your-freedom.de
PORT: 53
=> Connection Mode Drop Dropdown >> DNS => Select TWEAK NIGERIA MTN.
=> For Option Select And Tick , 1,3,7,6.
After that, just skip the rest and move on to the next step.
Input the username and Password of your-freedom account you created earlier and save.
After that, connect your modem with the default Mtn settings then go back to your-freedom and connect it also.
 That's all.
NOTE: For your browser and download manager to work with it, you have to configure your browser's proxy settings just as show below.
Proxy server: 127.0.0.1
Port: 8080
If you have any question, feel free to ask and also don't forget to share this post.

How To Permanently Delete A Facebook Account

Facebook is no doubt one of the oldest and most popular social media network at the moment. While the registration might the so easy and fast, same can't be said for deleting a Facebook account.
Even though you can easily create a Facebook account by just filling a few details and your Facebook account will be ready within a few minutes. If you want to delete a facebook account, it's actually different. Facebook only allows you deactivate your account first, after wish it will be deleted in a couple of weeks. But what must people don't know is that if you try to log in during the period your account is scheduled for deleting, then your Facebook account will be automatically reactivated.

So in this post, I will just show you guys how to permanently delete a Facebook account.

How To Permanently Delete A Facebook Account
=> First open your web browser and log into your Facebook account.
=> Now click on this link to open the Facebook delete account Page.
=> Click on delete account to go to the next page.
=> On the next page, input your password and fill the captcha to prove you are not a robot.
=> Now just click on OK and the account will be deactivated immediately and also scheduled for permanent deleting.

NOTE: This is where many people make the mistake. Make sure you don't try to login to the account within the period of two weeks or you will end up reactivating the account.

So that's it guys, if you have any question, feel free to ask and also don't forget to share this post.

Wednesday, 21 September 2016

How to Recover (get back) Deleted files on Computer?

First of all download Recuva software which is in last of this article. and install it.

First of all download Recuva software which is in last of this article. and install it.

Step 1


Step 2


Step 3


Step 4
Now Recuva will scan whole missing files in your Computer / Laptop.

Step 5


After finished


Step 6

Click on "switch to advanced mode". than Recuva will goes to advanced mode. choose the disc drive where you want to search and which file you looking and click on "File name or path" like:- pictures, video, audio, documents etc. than click on "scan" to find the files which was you deleted before. 


Step 7


 and after finished in last click on "Recover" button to recover your file which you searching. make new folder and recover and save.
Click here to download
IF THIS WAS HELPFUL FEEL FREE TO SHARE!!!

HOW TO PREVENT CHARGER CORD FROM DAMANGE!!! 

This might be very useful to whom it is concerned but everyone is assumed to face this serious problem. I stumbled on this post each time i saw it because; i finds it educating and also a lasting solution to frequent damage of USB chords.


Follow this steps accordingly


Look for a spring enabled pen or ballpoint then pull out the spring
Stretch the spring and wrap it round the USB chord at both ends
With this anytime your chord bends possibly roughly, the spring will always take charge of it and prevent it from getting spoilt.
hope you found this helpful?? Kindly Share it with your friends

Tuesday, 20 September 2016

How To Set An Expiration Date For Google Drive Links


Google drive is a very popular and arguably one of the best cloud storage service you can get right now. Aside giving you the platform where you can easily group and organize your files, it also offers some web apps to help you manage your files better.


Even though Google gives you a bit of control over your files , there are still limitations to what you can do. For instance, since Google drive does not give you the ability to create temporary links, if you share a link publicly then anyone who has access to that link can download the file and you can't revoke it until you delete it. 

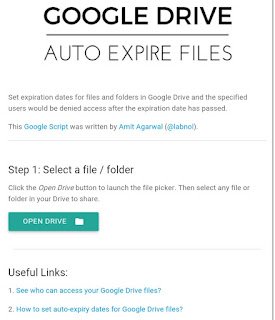
But fortunately with this simple script developed by Amit Agarwal, you can now revoke or create an expiration date to any Google drive link.

How To Create Expiration Date For Google Drive Links
=> First, click on this link here to open up the script and click on Review Permissions.


=> From the dialogue box that pops up, Click on allow to grant the script access to your Google account.


=> Click on open drive to access your files and folders.

=> Choose the file you want to create the link for and click on select.


=> Type the email(s) you want to grant access to and set the expiration.( You can input more than one email by separating then with a comma(,) sign.

=> After that just click on "Set expiration" and wait while the link is being created.

=> The link will be sent to the recipient via email.

Note: You can even revoke the link before it expires by clicking on "cancel" under your shared files.

That's all guys. I believe you have learnt something new today. If you have any question, just drop it in the comment box below and also don't forget to share this post on all your social media platforms.

Monday, 19 September 2016

Swix Swf xml file editor for Windows.


Hey Guys!
Do you know about SWIX? If you don't know than let me tell you. This is one very good editor of SWF (Small Web Format) file, such as XML file like a Flash Vortex file. If you want to know detail than contact me...
Thank you!!
Click here to download

Thursday, 15 September 2016

Windows password Rescuer (Reset) software for Windows Vista/7/XP/2000.


Do you know there is one software which helps you to recover your password, if you forget?? I think you know but you never use it. Here i am talking about Windows password Rescuer (Reset) software for Windows Vista/7/xp/2000. 
Dear friends! This software helps you to rescue to formatting or deleting your data from your computer. and if you changed your language before and after locked English language not changing than you can you this software too.

How To Find The Direct Link Of Any Movie On Google

If you are a movie lover then this post is definitely for you. Most of us, both the movie freaks and those who watch movies once in a while always love to get the latest movie. Although the easiest way to watch the movie of your choice is by visiting the cinema but not all of us can afford it and even some who can afford it might probably be too busy.


For many, the fun way of Watching the movies of your choice is by downloading and watching it at the comfort of your home or on the go using your smartphone. But being able to download movies this days can be very frustrating especially if it's latest movies, getting the direct links are not so easy and most of the ones available are filled with annoying ads and at the end of the day you end not being able to download anything.

So in this post, I will show you guys two different methods to easily download any movie of your choice. This methods are easy, fast and you also don't have to worry about any ad whatsoever.

Method 1:
=> Launch your browser and open Google.c om.
=> Copy and paste this codes in your search bar Movie Name -inurl:(htm|html|php|pls|txt) intitle:index.of “last modified” (mp4|wma|aac|avi)  
=> Replace "movie name" with the name of the movie you want to download.
For example: IP man -inurl:(htm|html|php|pls|txt) intitle:index.of “last modified” (mp4|wma|aac|avi).

=> From the search results that appears, just select one of the first sets and the movie link should be indexed in one of them.
=> Just click on the movie and download.
That's all!

Method 2: This particular method is probably a bit easier than the one above, although both of them are very similar.
=> Type Google.com in your address bar and open .
=> Copy and paste the code below in the search bar and add the name of any movie you want to download after it.
intitle:index.of? mkv Avengers

For example: intitle:index.of? mkv  deadpool.

=> Just click on search and open any of the First set of results that appears.
=> Scroll until you find the movie you want to download and click on it to Start the download.

So I have listed two different methods to make searching tge internet for movie links a lot more easier. 

If you have any question, feel free to ask and also don't forget to share this post among your friends.

How To Install Multiple Bootable Operating System On A Single USB Drive

In this post am just going to show you how to create a multi boot USB drive. A multiboot drive is Just a way of creating multiple bootable OS in just one single drive. Although thi
s is not something you will always need but there is no doubt it will come in handy .
Having a multi boot USB drive for your windows PC can come with a lot of advantages. Aside the fact that it saves you the stress of moving around with multiple USB drives, it also lets you save your precious OS in a single drive which can be used at any time.

How To Install Multiple Bootable Operating Systems on One USB

To actually do this, you will need a standalone application, so In this post am going to show you three different tools that you can use to create your own MultiBoot USB drive.
==> MultiBootUSB: Just as the name describes, this tool  basically lets you install and run multiple bootable Linux from a single drive. Although the minimum drive space required for this app is 16gb free space but it gets the job done.

The application supports 129 different Linux Distros including Ubuntu, Xubuntu, Kubuntu, LinuxMint, Debian, Fedora and many more.

Making a multiboot USB is easy with this app.
=> Just connect the USB drive to your PC and launch the application.
=> Select the drive from the step 1.
=> In Step 2, browse for the ISO file and select it.
=> In Step 3, click on the Create button.
You can also go ahead and create another ISO image with the same procedure above.

==>Xboot: This is also another great tool that lets you collect multiple ISO files into just one package. The application also features md5 checksum calculator to help verify the authenticity of the ISO image.
This app is very easy to use for both pro and new users.

How to easily reset a Windows 10 PC without losing your important files

Its quite normal for your Windows 10 PC to slow down after several app installs. Lagging could also be as a result of driver, registry or malware issues. Although we’d dropped a very helpful guide on how to fix a slow PC, resetting is sometimes the easiest fix but the fear of losing important files deters many. This guide will teach you how to reset your Windows 10 PC and most importantly, not lose your valuable files.

Will I lose my files and installed applications after I reset?

Installed applications? Yes. Files? depending on your selection. As a rule of thumb, backup all your important files to an external storage device (SSD, HDD, SD card or Flash drive). This guide is however aimed at preventing file loss as a result of the Operating System (OS) reset.

How do I reset my Windows 10 PC and still not lose my files?

Sponsored Links

* Note: Ensure that the PC’s battery is well charged or charging throughout the process (recommended) to avoid an interruption due to a drained battery.

There are two methods you could use:

Reset from outside Windows
Reset from within Windows (recommended)
you wish to retain your files but remove apps and settings, select Keep my files (Recommended). If you wish to remove apps, settings and files, select Remove Everything.
You should get a notification of what is to be removed

[AWARENESS][PROTECTION] Factory Reset Protection

What is factory reset protection (FRP) on Google Android devices and what does it do?  FRP works like this, if your device is lost, stolen, or wiped, only someone with your Google account or screen lock information can use the device. In concept this is a great idea and should keep criminals from using your phone after they steal it and maybe even keep them from stealing your device in the first place

Here Are Some Of The Problem With This New Built In Feature In Android 5.1 Lollipop And Above
You forget your own password and or Google account info.
You buy a used phone on line and the owner doesnt wipe the device correctly and you cant use it because of FRP.

Your kid plays with your phone and messes it up causing it to get stuck on this FRP screen. maybe you are older and the person at the carrier store
where you got your phone set it up for you and never even gave you your google account info. NOTE I have seen this happen.

There can be many good legal reasons that you may need to bypass FRP on your device so that you can use it again. unless someone shows you how to bypass FRP you dont have many options to get your device working again unless you can get a oem to repair it for you which isnt likely unless the device is new. FRP should be a feature that is turned on my a owner and only with many many warnings that must be read before the device owner can turn it on to protect them from any of these problems. Google please correct this and make FRP optional.

NOTE FRP is turned on once you add your Google account to the device and setup a screen lock thats it.


Knowing about all these problems I have been working on some solutions for all of you with devices you just cant use. Enjoy.

Access your Android's built-in Linux command line shell. Unleash your inner geek!

This is a new version of the popular "Android Terminal Emulator" application. Same great program, just with a new name.

Here are a fews Tricks You Can Do on your Android device using this app.

NOTE: This app requires ROOT Access, and you must grant it Root access before typing any commands, to do this;
✴Open the app and type 'su' without the quotes and press the ENTER KEY on your keyboard. (The ENTER KEY is used to send the command you typed)
✴Accept Root permission if prompted by SuperSU
✴Now go ahead and try the following tricks.
1. To Reboot Your Device Without Using Your Power Button.

✴Open the Terminal Emulator app and type 'su' (without the quotes) followed by the ENTER KEY to grant Root access.
✴On the next line, type reboot followed by the ENTER KEY to run the command
✴At this point your phone will be rebooted.


2. To Reboot Into Recovery Mode.

✴Open the Terminal Emulator app and type 'su' (without the quotes) followed by the ENTER KEY to grant Root access.
✴On the next line, type reboot recovery followed by the ENTER KEY to run the command
✴At this point your phone will be rebooted into recovery mode.


3. To Reboot Your Android Device Into Bootloader/Fastboot Mode and Samsung's Download Mode


✴Open the Terminal Emulator app and type 'su' (without the quotes) followed by the ENTER KEY to grant Root access.
✴On the next line, type reboot bootloader (NB: For Download Mode type reboot download) followed by the ENTER KEY to run the command
✴At this point your phone will be rebooted into Bootloader/Fastboot or Download Mode.


4. To view Files And Folder On Your System Folders And SD Card

This part is a little tricky but cool and easy if you have the brains to follow up.

✴Open the Terminal Emulator app and type 'su' (without the quotes) followed by the ENTER KEY to grant Root access.
✴Now on the next line, type cd system ie (cd space system) followed by the ENTER KEY, then on the next line type ls to view the list of files and folders in your system.
FOR SD CARD:
✴Type cd sdcard ie (cd space sdcard) followed by the ENTER KEY, then on the next line type ls followed by the ENTER KEY, to view the list of files and folders in your system.
NB: Whenever you want to enter a folder always type cd followed by space and the folder name. Eg cd Downloads


5. Delete Passwords, Pins and Gesture Lock on Any Android Device.

This is my favorite part of this tutorial, I do this every time for fun.

✴Open the Terminal Emulator app and type 'su' (without the quotes) followed by the ENTER KEY to grant Root access.
✴Create a password or Gesture on your phone, and lock your screen to confirm its Locked.
✴Now type this command in Terminal Emulator, rm data/system/gesture.key if you used a pattern lock and type this command rm data/system/password.key if you used a Password lock followed by enter to send the command.


Well guys, this is just a few things you can do with your Rooted Android device, If you have any questions please
click here to download

Tuesday, 6 September 2016

Delete your system temporary files in windows.


Hello friends!
Is your computer or laptop is slow down? Don't worry. Here is one information to delete system temporary files manually. Follow the picture instruction or
Go to:
Start.
Programs.
Accessories.
System Tools.
Disk Cleanup.
And Tick mark there which you want to cleanup....
Happy Computing...

Note :- To view large photo click on photo.

Unordered List

Sample Text

Powered by Blogger.

Sample text

Social Icons

Contact form


Followers

Featured Posts

Social Icons

Search This Blog

Search This Blog

Pages

Popular Posts

Recent Posts

Text Widget